Creating Estimates and Progress Invoices from Estimates

Many contractors create the estimates/proposals that they give to customers/clients outside of QuickBooks.  Once a client has accepted and signed a proposal, entering into QuickBooks as an estimate allows you to do progress invoicing from the estimate and better keep track of how much money is left in the contract.

So, let’s say Test Customer Corporation has signed a proposal for sitework, a new concrete slab and a CMU wall.  Here’s how to create the estimate:

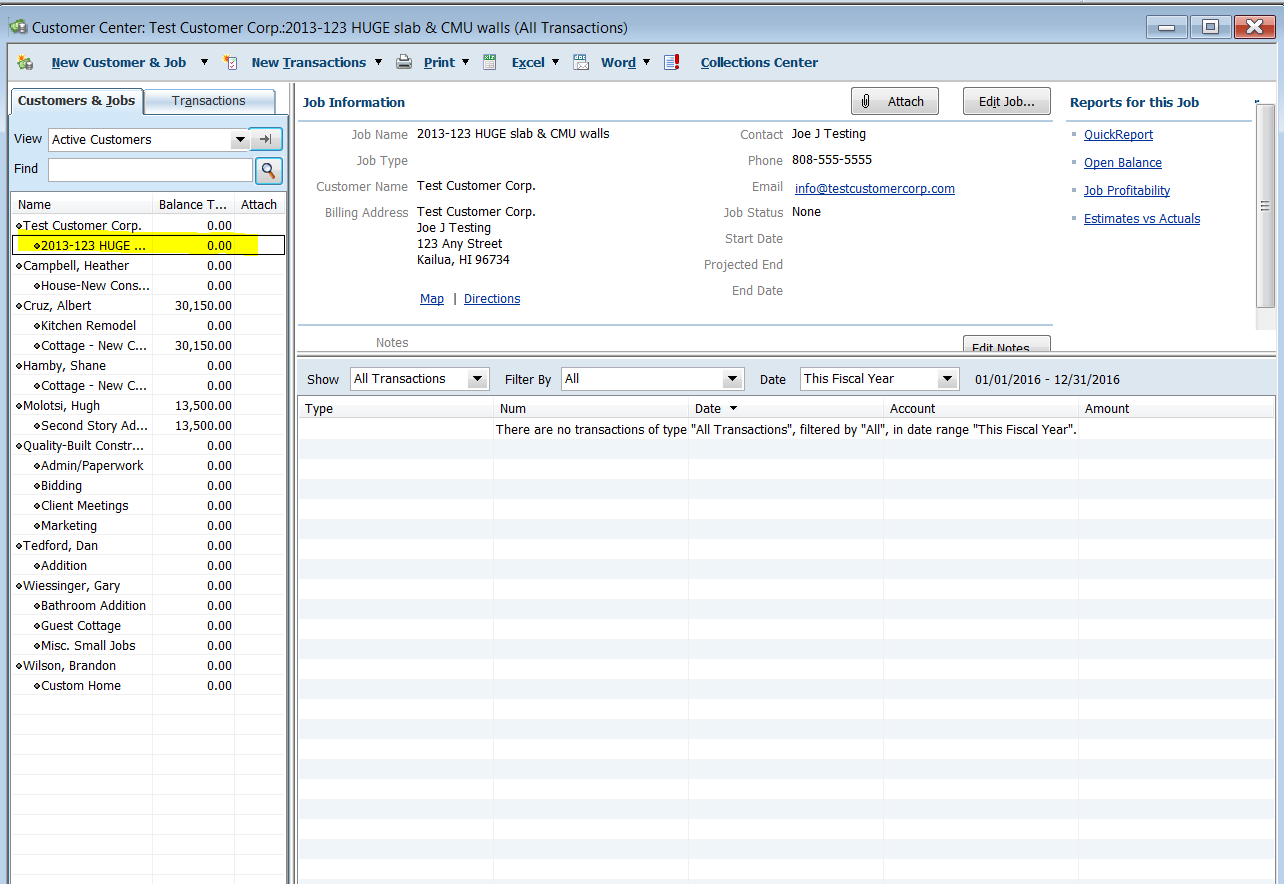
1) In the Customer Center, find Test Customer Corp, and add the new job.  While the new job is still highlighted/selected in the Customers:Jobs list, click on New Transactions > Estimates, which opens the Estimate window with the correct Customer:Job selected.

QB customer center

Then just start entering the data from the proposal that the client signed.  I personally use the same number for the estimate that I used for the proposal that the client signed, but you can use any numbering system that will work for you.

QB estimate form

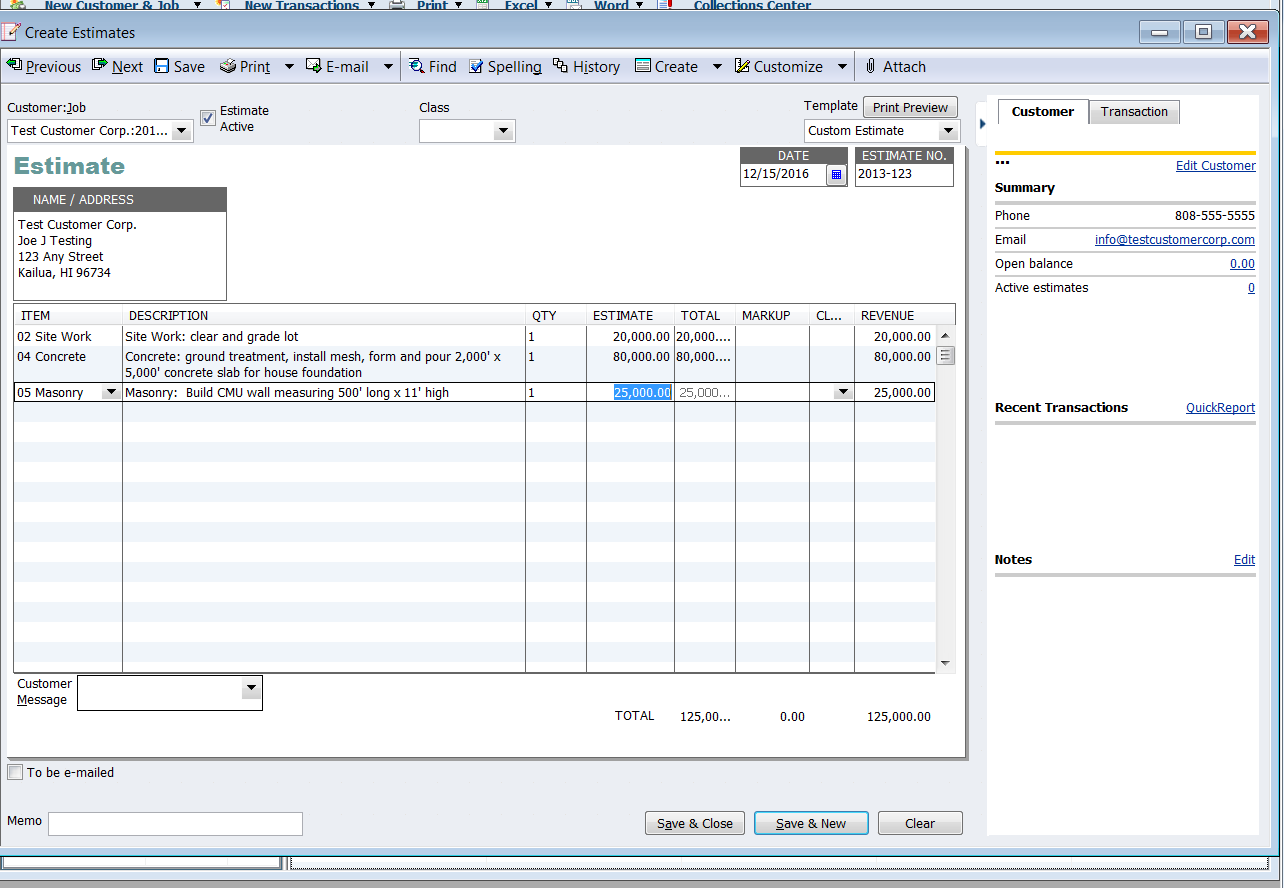
When you’ve entered all your items, descriptions and amounts, click “Save and Close.”

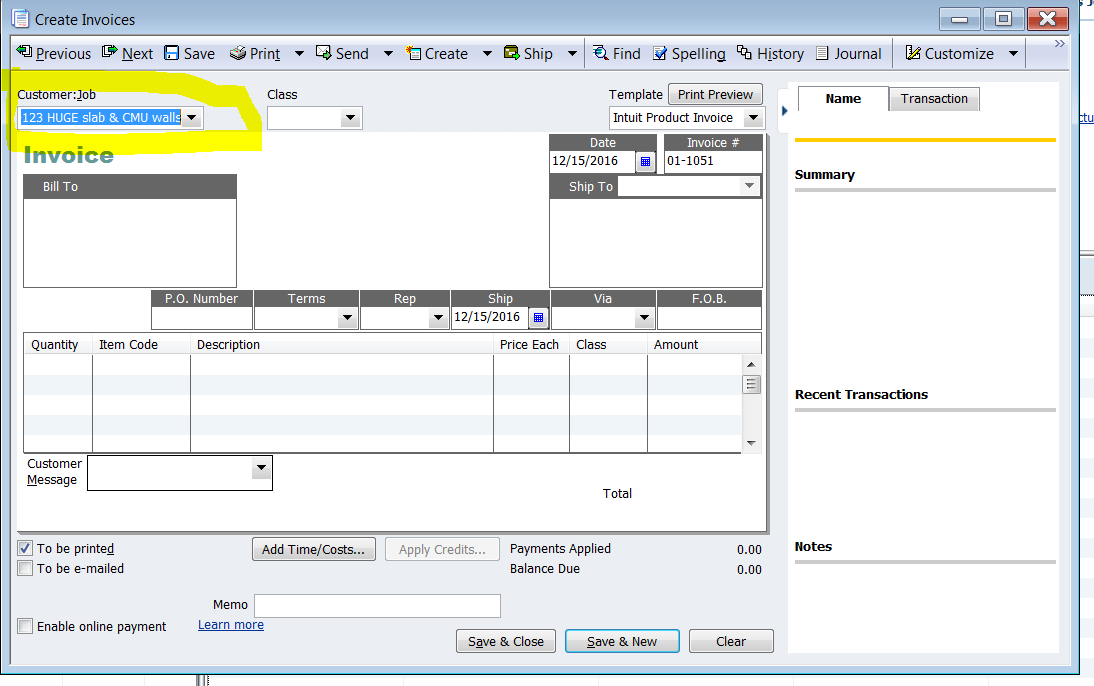
Then, when you’re ready, you can invoice from this estimate.  Again, in the Customer Center, highlight the Customer:Job in the list, then click on “New Transactions” > “Invoices.”  An invoice will open (the “Create Invoices” window) with the Customer:Job populating that field, as shown below.

invoice from estimate

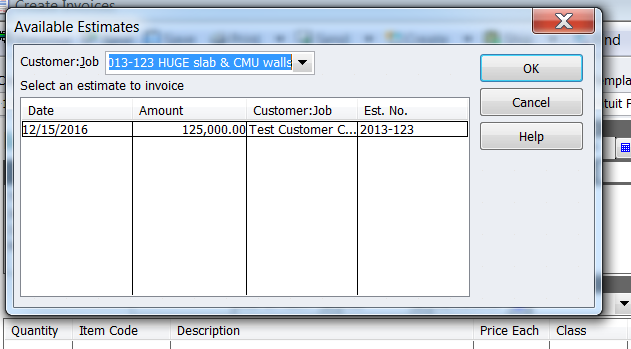
As soon as you hit TAB, the “Available Estimates” window will open showing the estimate you created for this Customer:Job. Click on it and click OK.

"available estimates" window


Then the “Create Progress Invoice Based on Estimate” window opens and gives you three choices:

1) create invoice for the entire estimate (100%).

create progress invoice based on estimate

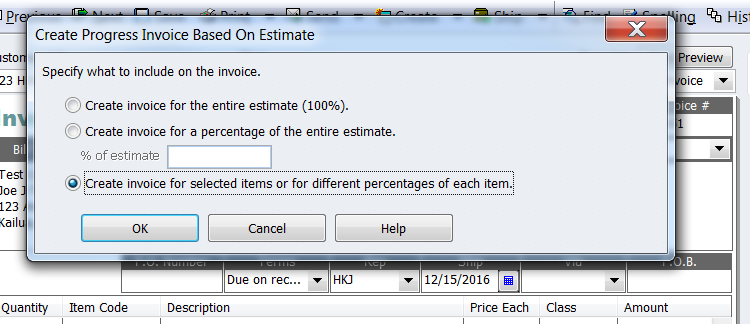
2) Create invoice for a percentage of the entire estimate.  If you select this radio button, you can type the percentage for which you want to invoice, and QuickBooks will calculate that percentage for all items.

3) OR Create invoice for selected items or for different percentages of each item.

Some companies always invoice for 50% down and the balance upon completion of work.  If that’s the way your company works, choose option #2 and type “50” in the % of estimate box.

For this cheat sheet, we’re choosing option #3 because our estimate contains several items that are done in sequence.

When this option is chosen, yet another window opens: “Specify Invoice Amounts for Items on Estimate.”

specify inv. amts. for items on estimate
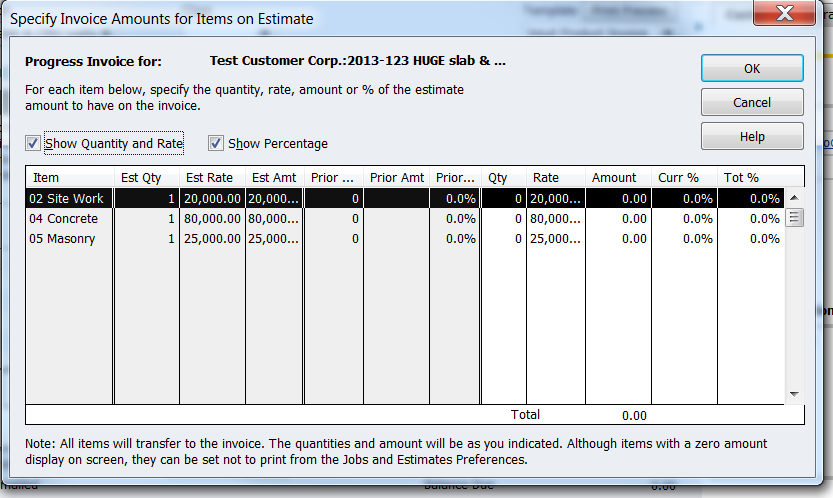
In our sample, we’re billing only for the completed site work, so we type 20,000 in the Amount column of the Site Work line, then click OK.

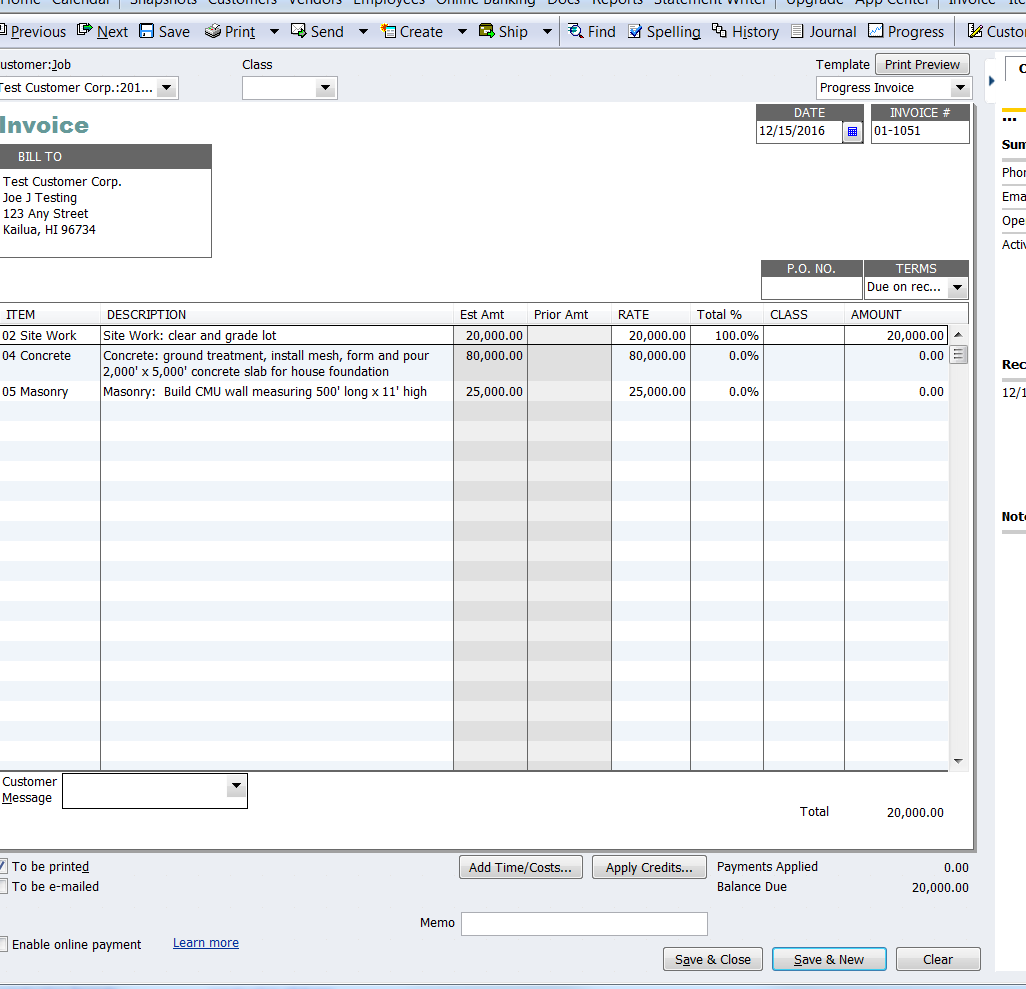
QuickBooks populates the invoice with the item and amount chosen.

invoice with item and amt

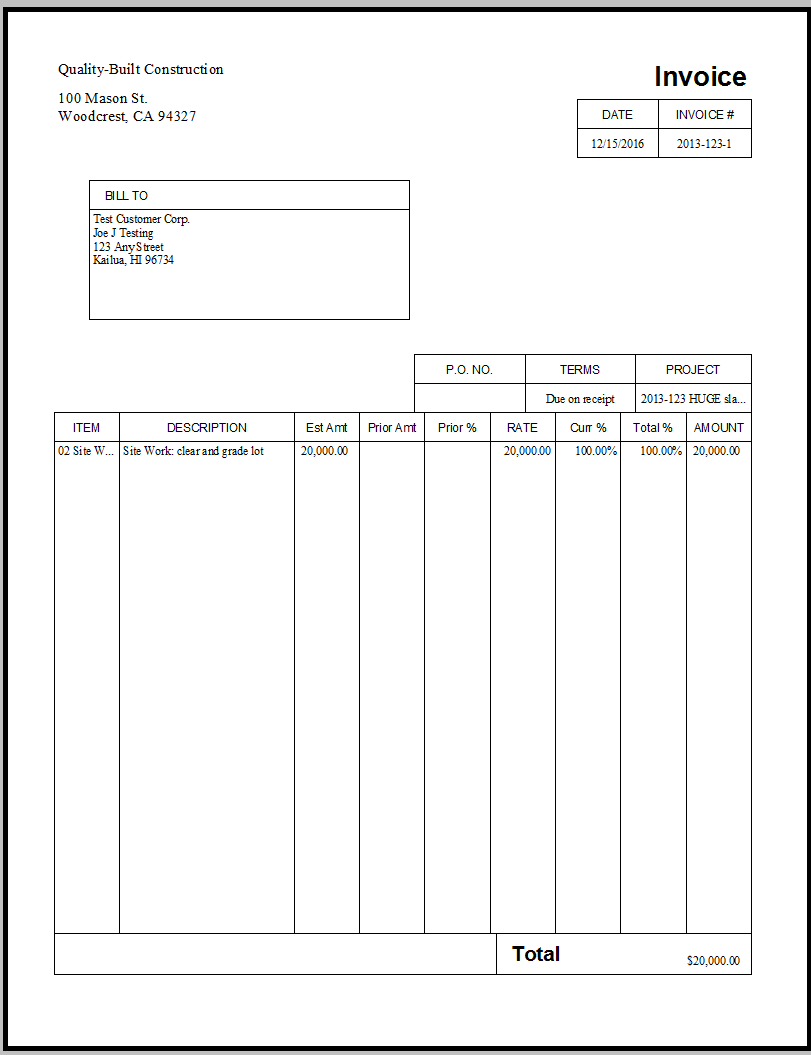
This is what the invoice will look like to my customer:

progress invoice with percentages

As the job progresses, you continue to follow this procedure until you’ve invoiced your client for the entire amount of the estimate.

EASY BREEZY!

If you have any questions, please feel free to call me.

I hope this is helpful.

Wishing you a happy and prosperous day.

Patti Killelea-Almonte


QuickBooks for Windows Keyboard Shortcuts

Keyboard shortcuts can be great time-savers, eliminating the need for you to repeatedly switch between the keyboard and mouse. Every version of QuickBooks has keyboard shortcuts.  If you’re using QuickBooks for Windows — either Pro, Premier or Enterprise — try out some of the shortcuts below.  I really enjoy them.  I think you will, too.

Please note: the “+” in the “Keys to Press” column is a delimiter; Don’t press the “+” key. 

Keys Category
Shortcut Editing QuickBooks Transactions and Lists
Ctrl+Del Delete the selected line in a transaction
Ctrl+Ins Insert a blank detail line in a transaction
Ctrl+N Create a new transaction or list item
Ctrl+D Delete the current transaction or list item. Please note that you cannot reverse this once done, usually
Ctrl+E Edit an item in an item list, or in a register
Ctrl+O If you are looking at a check in the write checks window, or in the check register, use ctrl-O to copy the check. You can then use ctrl-V to create (paste) a copy of that check if you are in the check register
F5 Refresh List. You only see this if you are in multi-user mode, when you have a “list” open. This will force QuickBooks to go back to the database server and retrieve the latest copy of the list. If multiple users are editing the list this may be useful. Note that all lists that are open at the time should be refreshed.
Shortcut Windows and Lists
Ctrl+W Opens the write check window to write a new check
Ctrl+Q Open a Quick Report for a list item when you have selected the item in the list
Ctrl+Y Open a transaction journal for a transaction, if you are viewing the transaction
Ctrl+J Open the customer center
Ctrl+A Open the Chart of Accounts
Ctrl+I Open the create invoice window to create a new invoice
Ctrl+L Open a list – if the cursor is in a field that has a dropdown list, such as selecting the item in an invoice detail line, this will open the list associated with that dropdown
Ctrl+U Use the list item if you have just used ctrl-L to open the list from a transaction. This is a very useful feature that many people aren’t familiar with. See a more detailed explanation in my article on Improved List Selection
Ctrl+R Most transactions have a register associated with them. This opens the register for the transaction you are looking at
Ctrl+G This is an odd one I’m still figuring out. If you are in a registerfor an account, entering ctrl-G will take you to the register for the “transfer” account associated with the line you have selected
Ctrl+F Opens the find window for the list or transaction type you are working with. This is the old-style Find, not the new Searchfeature (F3)
F1 Opens the Help window
F2 Displays the Product Information window, which has a large amount of information that can be very helpful when diagnosing problems in QuickBooks (Ctrl-1 is an alternate)
F3 Starting with the 2011 version, this opens the newer Searchfeature (as opposed to the Find feature)
F3 If you have the Product Information window open (by pressingF2), pressing F3 here will open the tech help window. This provides a wide range of system and diagnostic information, as well as being a quick way to view (and possibly edit, if you are careful) a number of support and technical files that relate to QuickBooks operations (Ctrl-2 is an alternate)
F4 This opens the QuickBooks Technical Support Helper window
Ctrl+1 This does the same as F2, opening the Product Informationwindow
Esc Close the current window
Ctrl+F4 Close the current window (same as Esc)
Ctrl+F6 Move to the next open window and make it active. NOTE that for some reason SOME windows don’t allow this, such as theAccountant Center (thank you Mary Longacre for pointing that out)
Ctrl+Tab Same as Ctrl-F6, moves to the next open window
Ctrl+H Open the Transaction history – if you have a transaction like an invoice, which has payments applied to it, the transaction history can be very useful
Shortcut Moving Around the Form / Maneuvering
+ (plus key) Increase a number in a form, such as a check number or invoice number
(minus key) Decrease a number in a form, such as a check number or invoice number
Alt+S Save the current transaction
Alt+N Save the current transaction and go to the next
Alt+P Go to the previous transaction
Tab Go to the next field
Shift+Tab Go to the prior field
Up Arrow Go to the previous line in a form
Down Arrow Go to the next line in a form
Page Up Move to a previous page in a form area or report
Page Down Move to the next page in a form area or report
Ctrl+Page Up Move to the first item in a list or register
Ctrl+Page Down Move to the last item in a list or register
Enter If you are viewing a report this will “quick zoom” – open a register or detailed report. In other windows this will often select the highlighted button/operation
Ctrl+Enter Record (save) the current record. If you have several buttons at the bottom of a transaction window (like “Save & Close”, “Save & New”, “Clear” and so forth) then Ctrl-Enter will select the best “save” option available. Enter will select the button that is highlighted, which might not be the best “save” option
Ctrl Start QuickBooks without opening a file. This is useful if you are having problems with the last company file you were using – and you want to start with the Open or Restore Company window
Alt Start QuickBooks without all the windows. If you have your desktop set to remember what windows you have open, sometimes it takes a VERY long time to start QuickBooks. This option will start it without opening all the windows
Alt+F4 Close QuickBooks
Shortcut Date Shortcuts
+ (plus key) Advance to the next day
(minus key) Previous day
T Today
W First day of the Week
K Last day of the weeK
M First day of the Month
H Last day of the montH
Y First day of the Year
R Last day of the yearR
[ (left bracket) Same day in previous week
] (right bracket) Same day in next week
; Same date last month
(apostrophe) Same date next month
Alt+down arrow Opens the calendar for date selection (the small date calendar, not the “Calendar” feature)
Shortcut Memorized Transactions
Ctrl+M Memorize the current transaction. This opens the memorize transaction window
Ctrl+T Create a new transaction from a memorized transaction. This opens the memorized transaction list
Shortcut Miscellaneous
Ctrl+P Print
Ctrl+R+P If you have been trying to register QuickBooks, and you have been given a “validation code”, you can easily get to the registration window where it asks you for this code without having to go through all the normal steps for registration. Open QuickBooks, select Help and then About QuickBooks.When the product splash screen shows, press Ctrl-R-P (hold the Ctrl key down then press R and P in succession). This opens the window that lets you enter your validation code
Shortcut Standard Text Editing
Ctrl+Z Undo typing or changes made in field
Ctrl+X Cut (copy the selected text to the clipboard and remove it from the field).
Ctrl+C Copy the selected text to the clipboard
Ctrl+V Paste text from the clipboard to the field
Del Delete a character to the right
Backspace Delete a character to the left
Home Go to the first character in the field
End Go to the last character in the field
Ctrl+Right Arrow Move to the next word in a current text field
Ctrl+Left Arrow Move to the previous word in a current text field

I hope this is helpful.

Wishing you a happy and prosperous day!

Patti Killelea-Almonte

UpWrite Ink Hawaii Logo

QuickBooks Cheat Sheet: Using a Zero-Sum Check to Record Unrealized Gain or Loss on Investments in QuickBooks

A non-profit client used QuickBooks for its bookkeeping.  The client had funds were invested in a brokerage account and wanted to be able to record dividend income, brokerage fees and unrealized gains or losses on the account in QuickBooks.

Tracking the individual stocks and mutual funds in QB wasn’t necessary for this client; the Board of Directors just wanted to be able to see the overall income and expenses in their monthly reports.

This could be done with either a journal entry or a zero-sum check, which will be shown here.  A zero-sum check serves the same purpose as a journal entry, and, as the name states, has a total value of zero.

Here are the steps:

1.  Create a new BANK type account named “Journal Entries,” which will be used as the account on which zero-sum checks are written and as the first line in — you guessed it — all journal entries.

JournalEntries Account

2.  Create an “Other Income” type account named “Unrealized Gains or (Losses)” and and “Other Expense” type account named  “Brokerage Fees and Charges.”

3.  Create a vendor to  use on the checks.  This will allow you to create reports by vendor.  On our sample check, we used “Investment Income.”

4.  Using the current month brokerage statement, determine the dividend income, brokerage fees, and unrealized gain or loss to the account, allocating each properly to the specific funds, if applicable.  Our TEST Non-Profit  Foundation has two funds that are sub-accounts under the “parent” brokerage account. Income and expenses are allocated by percentage to those sub-accounts.

5.  Go to BANKING> Write Checks.  A check form will open.  In the BANK ACCOUNT field at the top of the form,  select the Journal Entries account.  Enter a check number using any numbering system of your choice.  Our sample check uses the date of the statement followed by BRO for brokerage.   The amount will be 0.00.

6.  On the EXPENSES tab on the “stub” section of the check, record the dividend income, Brokerage Fees, and Unrealized Gains or Losses, allocating the amounts to the various funds on the second line so that the amount “zeroes out.”

zero-sum check for brokerage account


The graphic is a bit small so here is a close-up of the dividend income section:

zero-sum check close-up


Posting unrealized gains or losses can be a bit tricky, so here is a mnemonic to help:

DEAL-GIRLS mnemonic

The total amount of an unrealized gain is posted as a negative number of the “unrealized gain/loss” account (Other Income type account), and as (a) positive number(s) to the various sub-accounts that make up the brokerage account in the non-profit’s QuickBooks file.  This increases the amounts in the sub-accounts.

The total amount of an unrealized loss is posted as a positive number to the “unrealized gain/loss” account and as negative numbers to the various brokerage sub-accounts. This lowers the amounts in the sub-accounts.

Nothing is posted to the “parent” brokerage account.    Here is a close-up of that section of the zero-sum check stub:

unrealized loss closeup


Running a Profit and Loss Report dated prior to the brokerage statement and after the brokerage statement shows the effect that the entries have on the “unrealized gains or losses” and “brokerage account fees and charges” accounts.

P&L PRIOR to brokerage entries


P&L AFTER brokerage stmt entries


I hope this is helpful.

Wishing you a happy and prosperous day.

Patti Killelea-Almonte

UpWrite Ink Hawaii Logo
UpWrite Ink Hawai`i
Bookkeeping and Business Services

QuickBooks Cheat Sheet: How to Adjust Amounts Posted to the Wrong Class

If a business with multiple locations is using QuickBooks classes to track income and expenses between the locations, sometimes deposits or checks are posted to the wrong class.  For instance, in our sample two-location company, all deposits have been posted to one location, which skews the Profit and Loss Report by Class, as shown below.

two-location-misclassed-income&expense

The report above would lead a reader to think that the Kapolei Clinic wasn’t making any money at all, which is incorrect.  That clinic has actually made $15,000 during the reporting period, so we need to correct our records to show the correct allocation of income.

Therefore, we need to move $15,000 to the Kapolei Clinic’s income.  There are two ways to do this: the first — and probably most familiar method — is to use a journal entry. Go to COMPANY > MAKE GENERAL JOURNAL ENTRIES, and the General Journal Entry window opens.

Use the “Journal Entries” account as the first line of the journal entry to ensure that it will be easy to find in the Journal Entries “bank” account register later.

On the next line, choose the appropriate income account – in this case 43700 – Fee for Service Income –  to debit (which moves money OUT of the acount) and select the “Kaneohe  Clinic” class.  On the next line, you’ll credit the same income account but choose the “Kapolei Clinic” class.

GeneralJournal to reallocate income by class

Click SAVE AND CLOSE.  Running a Profit and Loss By Class Report now will show income  allocated properly to each location.

 P&L-2locations-reclassed

I hope this is helpful.

Wishing you a happy and prosperous day.

Patti Killelea-Almonte

UWI-Bkkpg&BizSvcs-175-51

Transferring Funds Between Accounts in QUICKEN

I recently did some consulting for a client who uses Quicken for her rental property management business.  Although I favor QuickBooks, the client has her reasons for using Quicken, and it’s her business.

In order to ensure that reconciling her bank account in Quicken to the bank statement goes well, I set up a clearing account (bank type account) for her.  It will function almost like QuickBooks’ Undeposited Funds account would — as a temporary place to hold the funds until she goes to the bank.

When renters’ checks for security deposits and/or monthly rent arrive, she can post them to the clearing account individually.  Let’s say she gets to the bank once per week.  When she goes to the bank, she simply transfers all funds from the clearing account to the operations checking account, and VOILA! the amount transferred should match her bank statement amounts.

Here are the specific instructions:

  1. Open the account from which you want to transfer money.  If you set up your Quicken 2014 Rental Property Manager file with a CLEARING ACCOUNT as explained above,  you’ll use that.
  2. Click the Account Actions icon (the UPPER of the two gear icons, which is highlighted in yellow in the screen shot below), and then choose Transfer Money.

QuickenRPM-trx$ screenshot

3.  The “Transfer Money Within Quicken” window opens.

TRX-$-within_Quicken

4.  Enter the date, and the amount of the transaction

5.  Verify the account from which you’re transferring money, the source account.

6.  Select the account into which you’re transferring money (the destination account).  If you want to transfer money to an account that you haven’t previously set up in Quicken, click Add New Account in the To Account list.

You can’t include a transfer and a category in the same Category field, but you can tag the transfer.

7.   Enter a memo for the transfer — for example, “January rental income.” (This step is optional.)

8.   Click OK.  When you use this procedure, your checking account in Quicken will be easy to reconcile to your bank account statement.

I hope you’ll find this helpful.

Wishing you a happy and prosperous day.

Patti Killelea-Almonte